

Create a banner in Canvas using PowerPoint
This post will showcase an innovative way to use basic PowerPoint elements and easily turn them into responsive banners using <div> code in Canvas. Modifying this simple trick will allow you to create a vast repository of banners. You can modify the height, colors, fonts, imagery, sizes, etc. Add a little pizzazz without being overly gaudy. You can see a couple of examples of banners on the companion Canvas course, and make sure to play around with the screen size to see how the banner adjusts to different widths.
Not all banners need to be responsive. I have plenty that I create using Visme or Canva that I think look great. The advantage to using this PowerPoint banner is that it is responsive. There are a couple of elements that are important for this responsive banner. For one, the image needs to have a solid background where the edges have no gradient or imagery. This allows me to create a solid color <div> that blends seamlessly with the image I create in PowerPoint. Another important thing is that my image should be simple and relatively small. Let’s open PowerPoint and get started creating our custom image.
Creating our PowerPoint image
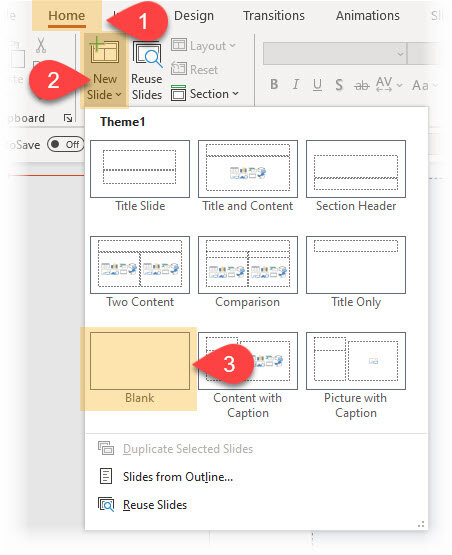
Begin by opening PowerPoint and adding a new “blank” slide. Click on Home >> New Slide >> Blank.
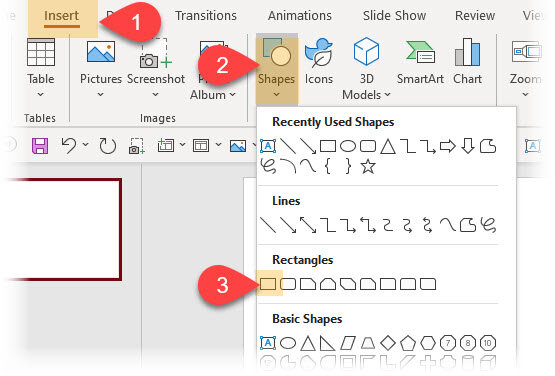
Now we can add a rectangle shape. Go to the Insert tab, then click on Shapes and select the rectangle shape.
Now draw a rectangle on your screen. You can change the rectangle to any color you would like, but be sure to remove the border from the rectangle. Double click on the shape, then click the Shape Outline dropdown menu and select No Outline.

It is important to remove the outline so that when we put it in a colored <div> in Canvas there are no borders around the image and the banner will appear seamless.
To put text in your box, there are two approaches you can try. The first is to click once on the rectangle shape and start typing. This will put the words directly into the textbox. You can adjust the font size, color, and family. Another approach is to put a textbox over the shape. Either approach will work.
Option 1: Enter text directly into the shape by clicking the shape and typing.

Option 2: Put a textbox over the shape and format the text.
Adding an icon to your banner is a nice aesthetic touch. If your institution subscribes to Office365 then you can access their icon repository. Otherwise you can find many free icons online. To add a Microsoft icon, click on the Insert ribbon and select Icons.


A trick for selecting icons is that you can browse Microsoft's list and select multiple icons at one time. Then just delete the ones you don't want to use.
Once you have your text and icon (and anything else you might want to add), the next step is to group all the objects. Select all of the elements, right click and select Group. This merges everything together into one element that can then be saved as an image. To save it as an image, right click once more and click Save as picture...
You can choose either PNG or JPG as your file format - it really won't matter which one.

I recommend that you open it in your image editing software (such as Photos in Microsoft) and just make sure that it is cropped right at the edge of the rectangle. Sometimes PowerPoint will save a little extra around the edges, and we just want to make sure it’s cropped cleanly.
Before you upload this image to Canvas, you’ll want to get the color for your shape. Every shade, hue, and tint of color has a dedicated HEX code - an alphanumeric identification. I use a lightweight application called Instant-Eyedropper to grab my color, though there are many similar products available.

This color information will be important when we style our <div>. Within Canvas you will upload your image at the top of the page.

The last step is to add our <div> and style it. A <div> in itself is an empty vessel, waiting for it to have content. It has no shape or dimensions, but if you put an image or text in the <div> then it becomes the size of the shape. In this case, we will want the <div> to be as tall as the PowerPoint image and as wide as the screen. Going into the HTML editor < / > on our Canvas page, we can put a <div> just before our picture <img>. You can start with this code:
<div width=”100%” style="background-color: #1F497D;">
Replace the HEX code with your own properties based on the color of the rectangle you created in PowerPoint. And after the image make sure to close the <div>: </div>
Here is what my code looks like:
<div width="100%" class="border-round" style="background-color: #5282bb;">
<img style="margin: auto; display: block;" src="https://canvas.instructure.com/courses/2560052/files/127281433/preview" alt="Banner 2.png" width="232" height="75" data-api-endpoint="https://canvas.instructure.com/api/v1/courses/2560052/files/127281433" data-api-returntype="File" />
</div>
You’ll notice that I included a class called "border-round", which is additional code that is telling Canvas that I want the corners to be rounded instead of right angles.
You can go into the Image Options box by clicking on the image. From there, you can set a custom height. I would adjust the height as opposed to the width. The <div> will automatically adjust its height to match the image. Anywhere from 50-150px should be a fine height and you can explore what looks good with your banner.

With this process, you can play around with various color schemes, CSS styling properties, font types, icons or images, patterns, etc. What we accomplished today is basic, but explore your options and spice up your course content.
Please consider subscribing to our YouTube channel for more Canvas tips and tricks. It is so easy and so free. The only thing you have to do is click this link: http://bit.ly/how2canvas
You can also visit our companion Canvas course for examples of our tips and tricks.
And follow us on social media
Twitter: https://twitter.com/HowToCanvas
Instagram: https://www.instagram.com/HowToCanvas
Facebook: https://www.facebook.com/HowToCanvas